I finally decided to invest in some hydrangeas 3 or 4 years ago, well I had a good amount of flowers that were not usable because they didn’t get enough shade. So I decided it was time to build a shade structure, I decided this two years ago but we finally put it up last summer. I also decided that since I was putting one up, maybe I should just put two up. Now I have a space for all sorts of shade loving stuff: ferns, astilbe, hostas, even mint likes a little shade.
I had seen a few different set ups at other peoples farms. The most common seems to be a caterpillar tunnel with shade cloth over it. I felt like that design would involve buying a lot of stuff and lead to some wasted space in my tiny and overcrowded field. The design I was more interested in was one I had seen that came from a ginseng farm. Posts in the ground with shade cloth flat along the top. So I made a couple of inquiries with people using some form of this set up and here is what we came up with. FYI, I’m not sure that it is any better than a caterpillar but it’s what we did.
-
- measure and drill holes for eye bolts
-
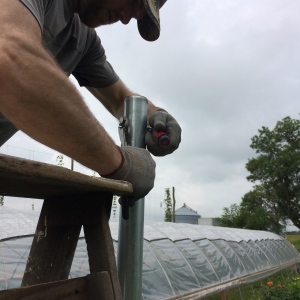
- pound in posts then put in the eye bolts
-

- smile and move on to the next one
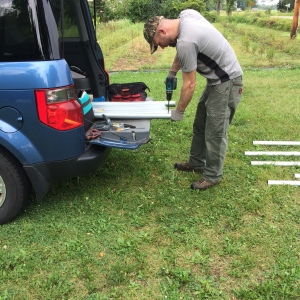
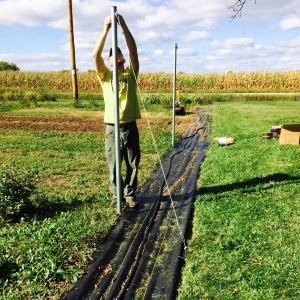
We used 10 foot long sections of 2 inch conduit (not fence top rail) and waited until the day after a good soaking rain. Then we pounded it 3 feet into the ground with a post driver. The shade cloth I have is 80 feet long so we put in 3 posts per side spaced 40 feet apart. Then put the eye bolts in since they get in the way of that post driver if you put them in before. We did not set these posts in concrete, it’s probably not a bad idea to do so, but we are going for cheap and easy. We chose to provide downward tension with cables and ground anchors. Seemed easier on paper but a tractor with an auger and a bunch of cement is probably easier. We don’t have a tractor with an auger, and there is already stuff planted here so a tractor would not fit without crushing my plants. So manual labor it was for us (and I keep saying us but it was mostly Nich.)
-
- thimbles inserted into the eyelets for the cable to run through. We have since decided that this step in not necessary, the cable can just go through the eyelets
-
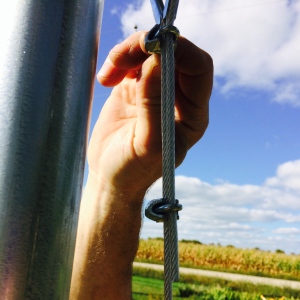
- cable in and wire rope clips to secure it. There is a right way to use these clips, there is also a wrong way, look it up.
-

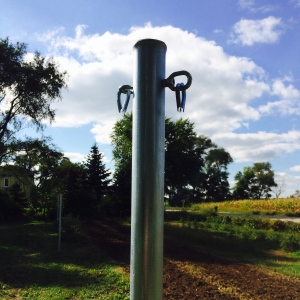
- finished up top
-
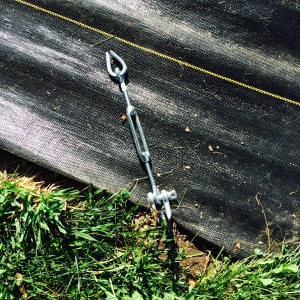
- turnbuckle attached to top of ground anchor with thimble for the cable to run through
-
- turnbuckle with cable inserted secured, with wire rope clips
-
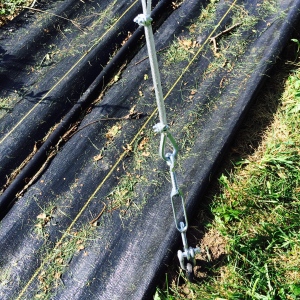
- making sure everything is tight
All six posts were secured in this way. We used 30″ long auger style earth anchors to secure the cables. We get a lot of wind out there so we wanted to make sure that these things wouldn’t pull out of the ground. The anchors came from Growers Supply, they are heavy but we’re only about a four hour drive so shipping was not prohibitive. All of the rest of the hardware and cable came from e-rigging.com, we chose the coated cable since it’s a little nicer on your fingers.
-
- pull shade cloth over
-
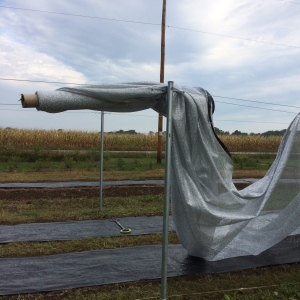
- pull shade cloth over
-
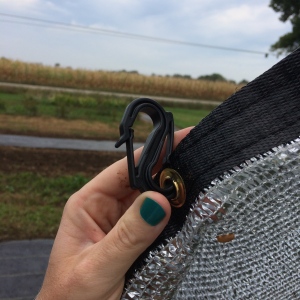
- plastic clips
-
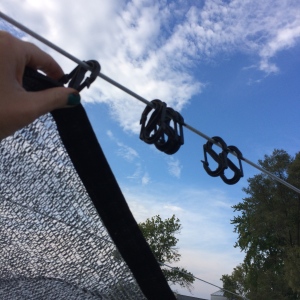
- clip cloth to outside cable
-
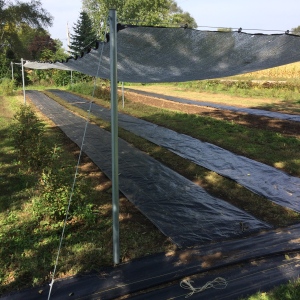
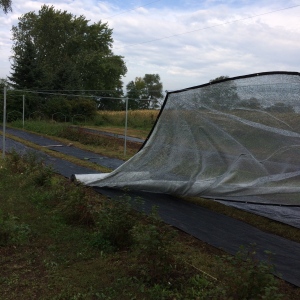
- finished product
-

- planting in the shade
We ran cable around the perimeter for clipping the fabric on, as well as zig-zagging from post to post to hold up the shade cloth and keep it from sagging. I choose those plastic clips to make it easy enough for me to get this cloth on and off every year, it’s easier with two people but can be done by myself. You can see that the sun does come in on that south bed, the degree will change throughout the season. Likewise there is shade on the bed that is not covered to the north. I planted shade lovers in the middle bed which always gets shade and plants that like the shade but don’t need it in the beds on either side.
We chose the aluminet since it is physically lighter and it allegedly keeps things cooler, it is more expensive. These concerns were really more related to the choice for covering the hoophouse, but since this is what I was buying I bought a couple extras for the shade structure. And it really is light, I can easily handle that big piece of cloth by myself… if it’s not too windy.
We built two of these structures, which are 80 ft x 14 ft, which was decided by the fact that I had two extra pieces of shade cloth in that size, which were taped with grommets every 2 feet. So here is the cost breakdown:
- 2 shade panels: The invoice is too hard to find but I think it was about $800-1000 for both with shipping, we used a local supplier but it wasn’t a stock item so they were shipped anyway.
- 12 posts and eye bolts/hardware for the top of the posts $250 at Home Depot and a local hardware store.
- 12 ground anchors and those plastic clips $170 (including shipping) from Growers Supply.
- A big spool of coated cable and all of the rigging hardware $215 from e-rigging.com, we might have cheated a little on this one since we still had a some of these things leftover from the hops trellis project.
So about $800 for each structure and it took two of us a little over two days to complete.

Thanks for posting this. I am very interested in the design, but we live in a very very windy area and I wonder if the wind would shred the shade cloth. I love seeing new ways to do things thriftily. I hope this works out for you.
We get some pretty windy days being that there are soybean fields as far as the eye can see. I decided to also zig zag cable over the top of the fabric to keep it from flapping so much this year. I think the caterpillar tunnels with fabric are probably a better idea if wind is an issue.
So glad you are blogging again! I appreciate your honesty with past posts and it’s nice to see and hear about more than just the good and beautiful.